

 DIY is sometimes the best solution if you want your planner to be exactly tailored to your needs and likes. This article is all about making your dividers as bright and colorful as your ideas. Planner sections that are well defined will help you be even more organized.
Even though there’s a lot of great options to buy cute dividers out there, crafting is part of the fun of owning a planner. Plus, it always gives you an excuse to buy more craft supplies and lovely paper pads.
To help you in this little project, here’s a free printable template that will help you create your own dividers in no time. These dividers are compatible with Filofax Personal and Kikki K medium planners. 4 tabs will be visible with this template when you open your planner.
First – Define your categories
Dividers help you to organize your thoughts, plans, and actions by categories. To get the best use out of dividers you really have to first, think about how you want to set up your planner depending on your life and how your mind works.
I can’t give you any general tips about that, we all have our different ways of thinking and so we should all find the system that works best for us.
There’s no need to create a “fitness” category if you know you’re never gonna exercise or do anything related to this topic. Don’t feel forced to create some basic common categories if you know from the start that they don’t suit your lifestyle or your habits.
Some people love to separate topics a lot and will, therefore, feel more comfortable with more divider sections while some people prefer to keep things simple and only have very few sections. Once again, it’s a very personal choice, but you want to make sure that you think about this clearly before getting started in creating your dividers.
Second – Cut your dividers
Once this first step is complete, you should now know how many dividers you’re going to create. You can now have fun and spend hours looking through all your papers, pick a few that go well together, and move on to the more crafty steps of the process.
I’m sharing this divider template in two types of files : pdf and Studio 3 for Silhouette machine owners.
Depending on your preferences (and depending if you own a Silhouette machine), you have 2 options :
- If you prefer to use the pdf template = Print, cut, trace, cut
- Print the template on 8,5×11 inches paper (using thick paper, like cardstock, will make the next step easier). Make sure to print to “actual size” or 100% scale.
- Cut both shapes and use them as templates by tracing them onto your scrapbooking papers, cut again, et voilà !
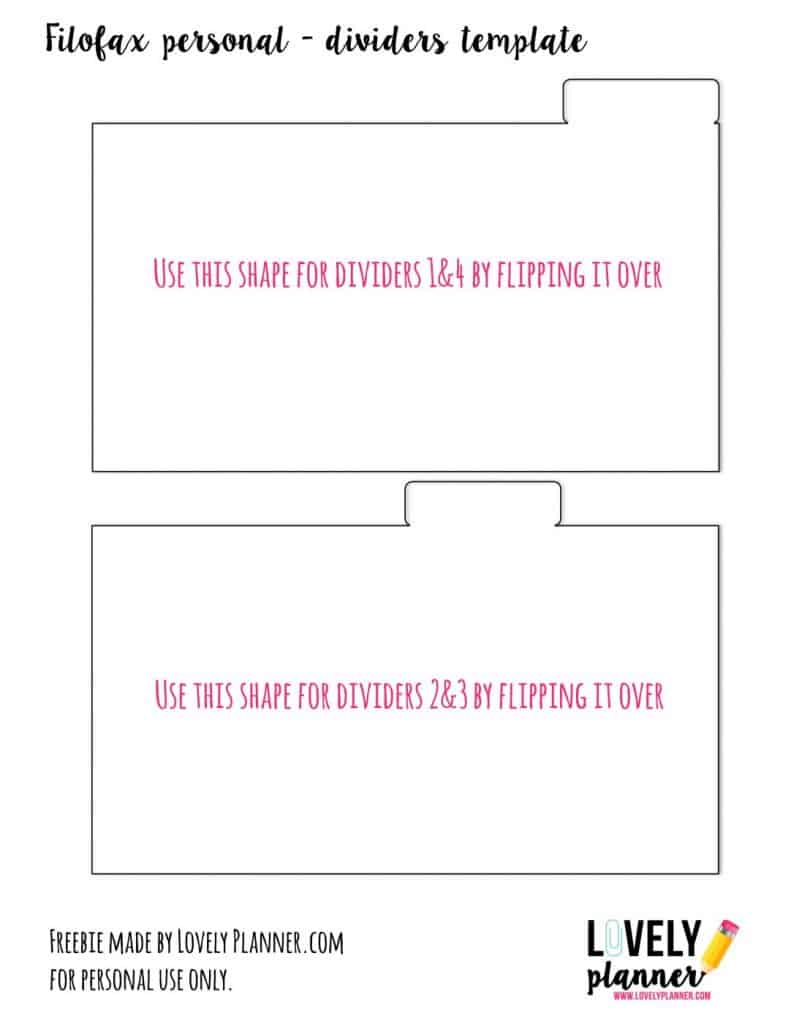
- If you prefer to use the Silhouette file = cut
- place the paper you chose directly on the Silhouette mat, adjust your cutting settings and cut directly through the Silhouette software.
Download this lovely freebie – Silhouette
Third – La touche finale
Now is the time you can add your final touches to make your dividers more durable and practical.
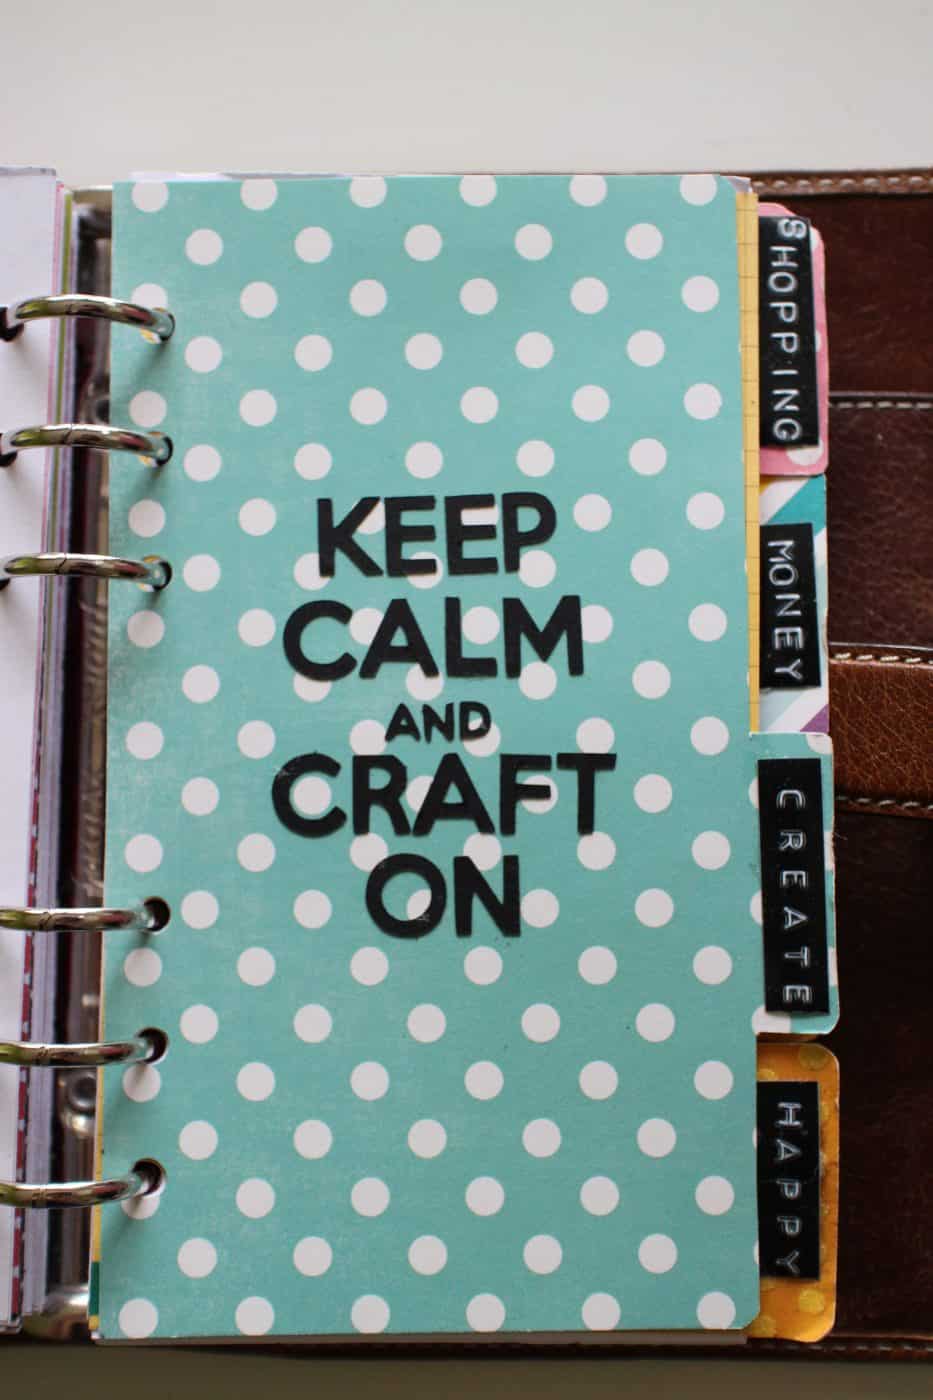
I personally chose to add inspiring quotes/words related to each theme on each divider. These texts were cut with the Silhouette machine and then glued meticulously on the dividers. This took quite a bit of time because some paper pieces were very thin.
I also added dymo labels on my tabs because I like their retro look and I thought they worked well with the colorful papers I picked.
At the time I made these dividers I didn’t choose to laminate them but now, a few months later, I kind of regret I didn’t. The corners (especially top and bottom corners) show signs of use, which probably wouldn’t have happened if i laminated them.
Here are my dividers:


If you followed all these steps, congratulations, you should now be left with a great looking planner and shiny new dividers! I know you don’t necessarily need a template to create your own dividers but hopefully, this will help you or motivate you to try it out!
If you used this template, feel free to share the results on instagram and tag me/follow me (@lovelyplannerblog) or use the hashtag #lovelyplanner 🙂
Don’t forget to have a look at other planner freebies I shared on the blog!

12 comments
Thank you for sharing!
I hope to learn full of things in your next articles.
Arrived at your blog via your etsy store. Some great tips, thank you!
[…] Download Pin from vintageglama1 Rate this post 0 Share Tweet Pinit Google+ Email […]
The Silhouette version is a pdf…do you have a SIL file for it? Thank you!!!
Oops! I just corrected this little mistake 🙂 you can now access and download the silhouette file 🙂 enjoy!
You are so pleasant and lovely! I’m so glad I signed up; super fun tutorials, printables and I enjoy reading your articles. You are super talented, thank you for sharing!
Blessings, Kimberly
Hello. Thanks for explaining this great how-to for A5 dividers. I’ll check out the rest of your website for ideas! Have a great day!
I came across this page through Pinterest and love it but when I download the pdf file, it’s blank. All I’m seeing are the words across the page. Can you update the file to download ?
Oh no I’m very sorry about that! Thanks for letting me know! I just updated the file, so you should be able to use it now 🙂
thank you for sharing. I really like your stuff. I do not a silhouette machine and tried the pdf version but it was a blank page, though… I mean, the page is there with instructions but no template.
Oh no I’m very sorry about that! Thanks for letting me know! I just updated the file, so you should be able to use it now 🙂
This is exactly what I was looking for to organize my photos into photo boxes. The boxes a little wide and many dividers are made to be a touch larger than the photo’s. Boxes that are narrow tend to cost a lot more than the standard size at the local craft stores. We have about 2,500 pics from our summer vacation to NY between both my husband’s and my phones. I want to print them, but storing them in an album is a bit, well…we have too many pics for that. We will probably drop that number to about 1/2, that’s still a lot of pics. Now I’ll be able to separate them by day or subject using these! Thanks so much!